

The Rubik’s cube is a popular puzzle of all times and nations. Despite its apparent simplicity, assembling the faces of the same color turns out to be difficult. We offer you a number of schemes so that you can choose the best one for yourself. So, how to learn to assemble a Rubik’s cube – a detailed guide for children and adults.
First, assemble the right side.
We recommend starting the assembly from the right side of the cube. There are many options for actions here, we will not describe them all – we will focus on the main ones. Try not to cram the formulas, but to understand their essence. An approximate scheme of actions is in the pictures, for understanding the actions are signed step by step (1, 2, 3 …, a-b-c).

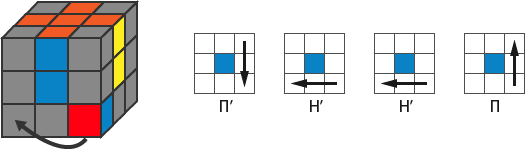
Volumetric cross on the right
On one side of the cube, assemble a cross, the colors of which will correspond to the shade of the squares in the center on the other sides. Find a suitable cube with edges, rotate the front part so that the structure moves up. Repeat these actions a given number of times.
Sometimes rotations break already assembled structures. In this case, move the cube you found to another plane. If it is not on top, return to the first action. When moving to another plane, “breakages” are also likely. Eliminate them using a similar scheme described above.
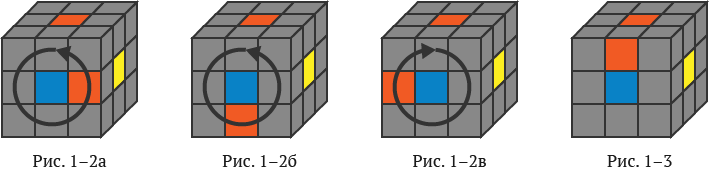
When the cube you found goes up, use one of the schemes. These are examples of combinations, other options are also used.


Sides and Belts
The next step is how to solve a Rubik’s cube. We provide one of the many possible action schemes so that you have something to focus on. The task is to place the corner cubes and complete the step. Then remove the wrong corner. If the cube hides at the bottom, move it to the lower zone, fix it in a new place using the formulas indicated above.
Another belt
The next step in the Rubik’s cube instructions is assembling the second zone. Two formulas will do – use any of your choice. Find a suitable option in the third zone, both shades (if there is another zone) need to match. Move the found combination to the second zone diagonally.
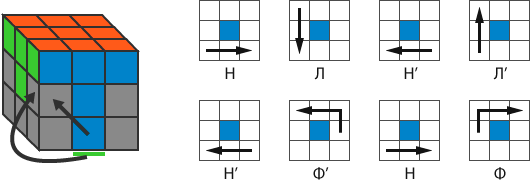
If you can’t find a suitable cube, use the same schemes, but with some caveats. You will need to move any cube from the third zone to the second line. If you do everything correctly, the desired option will appear.
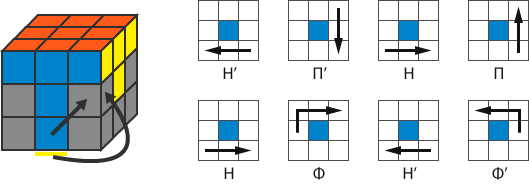
The cross from the other side
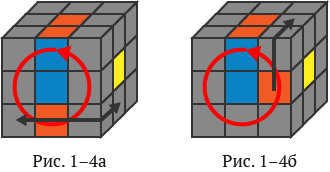
When the previous stages are completed, start assembling the cross from the opposite side of the cube. It is created without the third line and taking into account its colors. That is, at this stage, only the cross is assembled and coordinated with the shades of the third belt in the future.
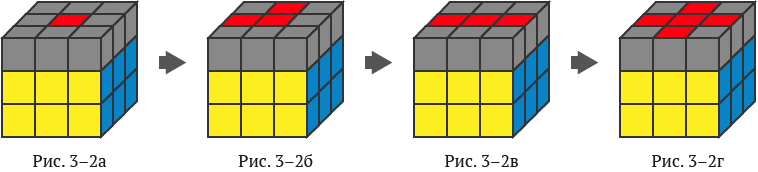
To switch between combinations, use the combination Ф П В П’ В’ Ф’. It is repeated up to 3 times, taking into account the moment which combination was used earlier. If the cross is already assembled, the step is skipped. When there is only one square, the central one, the formula is repeated three times, at an angle twice, if we are talking about a line, then one.
The order of assembling the Rubik’s cube is shown in the pictures. Before starting to perform the formula, arrange the squares exactly as shown in the pictures.
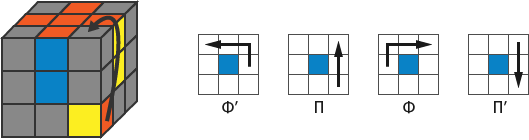
Make a coordinated cross
The next step in solving a Rubik’s cube is to make a cross. It should match the shades of the belt. Rotate the upper belt until the shades match the squares located in the center of the upper belt. There are only two possible combinations – matches in a line or a corner.
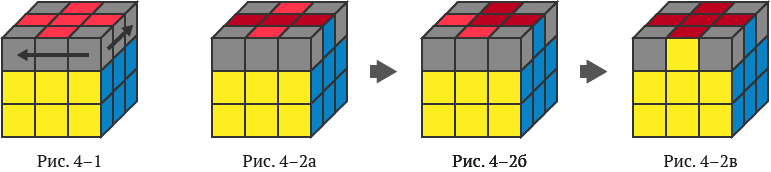
Move the incorrectly placed cubes in the cross that are located opposite each other. When you perform the formula from the picture, rotate the upper belt until the pair of colors completely matches the middle squares on the upper belt. If the pair of ends of the cross does not fit into the required places, the combination will change to a match of colors at an angle.
Swap the cross cubes that were placed incorrectly, located diagonally between each other (we are talking about a pair of adjacent cubes). After implementing the formula, the cross is ready, and the tones will begin to match the colors on the upper belt. If you did not manage to achieve the desired results the first time, repeat the steps.
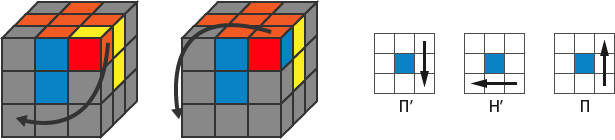
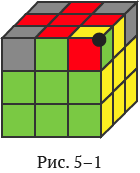
Place the corner cubes
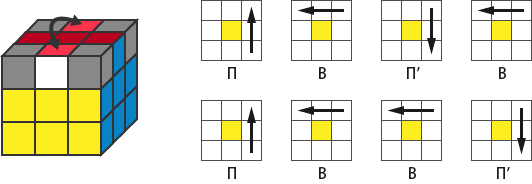
The corner cubes are placed using the following pair of formulas. If you follow the instructions, you will be able to place the corner cubes each in their place, without errors in the turns. The black dot is a cube that is in its place, but turned the wrong way.


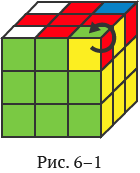
Unfold the corner cubes
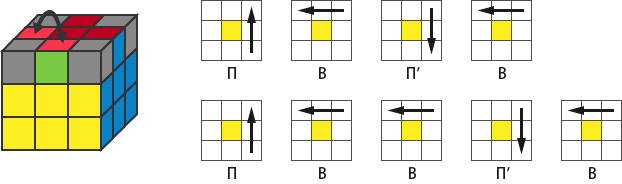
The rotation of the corner sides is performed according to the P’N’PN scheme, it will need to be repeated the required number of times. Before starting, carefully read the section and make sure there are no questions. One wrong action – and the result will be wrong.
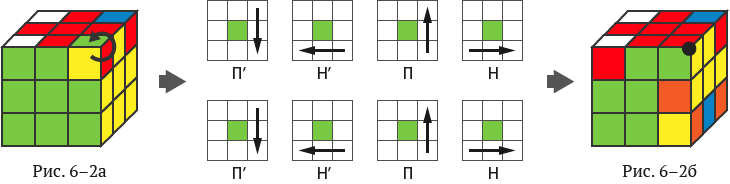
After the assembly/disassembly process begins, the cube will be disassembled. It will be assembled only as the corner cubes are correctly turned. The point is that all corner sides are turned in one operation, maximum endurance and patience are required. It rarely works out the first time, even according to the instructions. Be patient, if something doesn’t work out, go back and repeat the steps.
Important points
Recommendations to consider during assembly:
- The standard 9-move formula is performed 1-2 times until the corner cube is in the desired position.
- When the corner cube returns to its correct position, the Rubik’s cube will collapse. You don’t need to do anything yet – everything will be restored when you finish working with the corners.
- Do not spin the cube until the end of the last step.
- When you have set the first corner cube (see pictures above) correctly, rotate the top layer, and the next corner cube will move to the upper right corner. If the rotation is already correct, repeat the rotation of the top layer.
Repeat the 8-move formula (up to 2 times, depending on how everything works out) and follow the recommendations above. Repeat the actions until the corners are correctly positioned and the Rubik’s cube is completely assembled. If it doesn’t work, take a few steps back to analyze where the mistake was made and correct it.
Now you know how to solve a Rubik’s cube quickly, you will be able to spend family evenings with children or yourself with maximum interest.