GIMP lets you save a JPG, a PNG, a screenshot or an illustration as a PDF without uploading the file to a third-party site. That is handy when the image contains personal data, a work mockup or a document you would rather not hand over to an online converter.
Below is a step-by-step method for a single image, plus an explanation of how to combine several pictures into one PDF. Menu item names may differ slightly depending on GIMP’s interface language, but the logic is the same. The instructions apply to GIMP 2.10 and GIMP 3: the menu commands are the same, and only the set of options in the PDF export dialog differs.
When GIMP is a good fit for creating a PDF
- You need to turn a single image into a PDF to send, print or archive.
- You need to combine several finished images: each layer becomes a separate page.
- You need to crop the picture, remove extra margins or add a caption before exporting.
If you need an editable document with tables, forms, clickable links or precise text layout, a word processor or a page layout program is a better choice. GIMP is a raster editor: it makes a PDF from an image rather than turning it into a text document.
How to save an image as a PDF in GIMP
Open the JPG, PNG or other source file
Launch GIMP and choose File → Open, or drag the image into the program window. Another way is to right-click the file, choose Open with and pick GIMP.
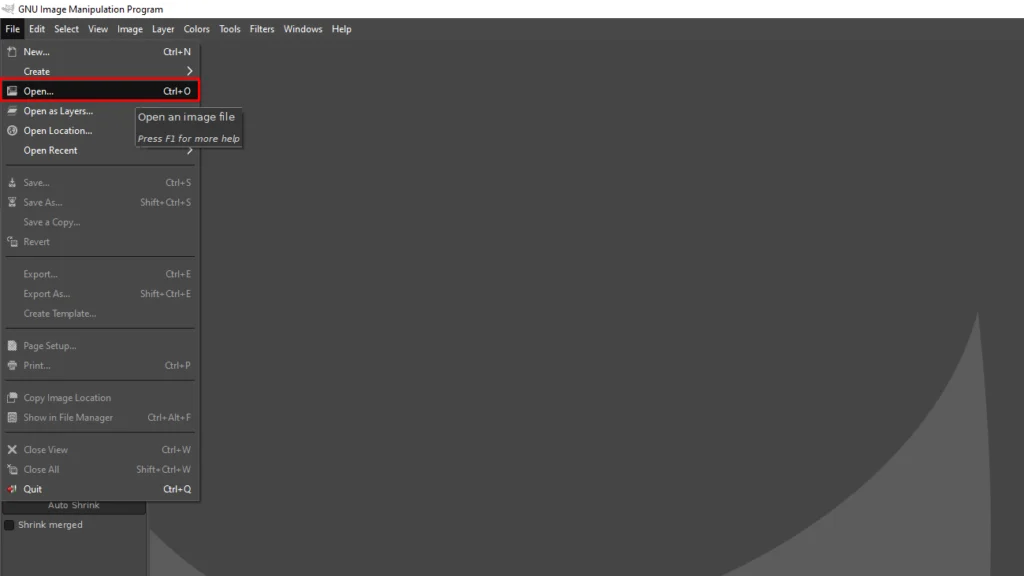
Result: The image is open in GIMP.
Check the size, orientation and any extra edges
If needed, crop the image, rotate it and check that small text is readable. For a screenshot with text, do not scale the file down too much: the PDF will look sharp only if the source has enough resolution.
Result: Before exporting, you see exactly the crop and size that will go into the PDF.
Choose Export As
Go to File → Export As or press Ctrl+Shift+E. Do not use the regular Save command: it is meant for a GIMP project in the XCF format.
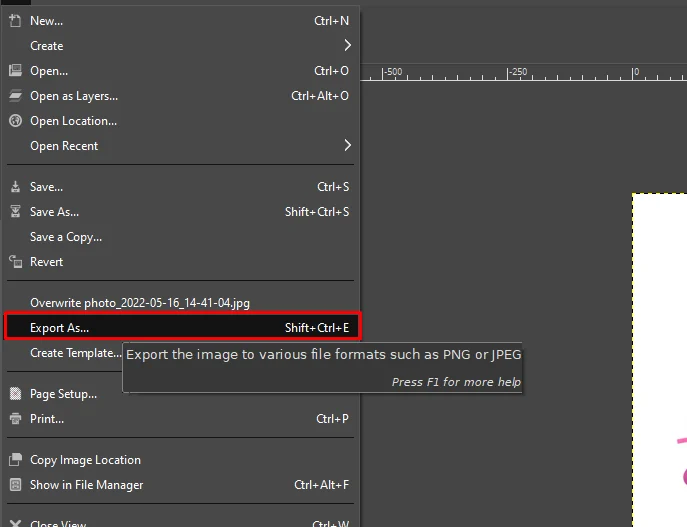
Result: A dialog opens where you choose the folder, name and format of the new file.
Enter a file name with the .pdf extension
Choose a folder and, in the name field, type a name that ends in .pdf, for example scan-document.pdf. GIMP will recognize the format on its own. Another option is to expand the list of file types and choose Portable Document Format.
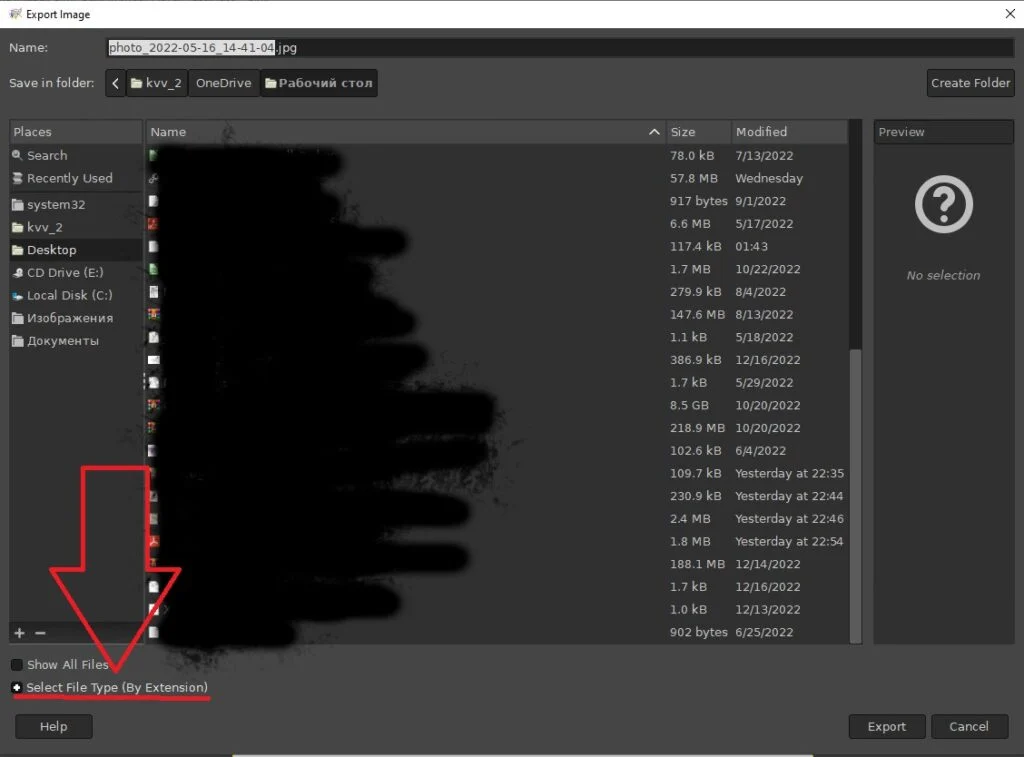
Result: PDF is selected: the file appears in the folder once you confirm the export.
Set up the export and confirm the save
Click Export. In the options dialog, the default settings are usually enough for a single image. After you confirm, open the finished PDF and check that no text is cut off, the image has not been rotated and the file is saved in the right folder.
Result: The PDF is saved; you can open it in a browser or a document viewer.
What options the PDF export dialog offers
After you click Export, GIMP shows a dialog with PDF options. For a single picture you can leave them unchanged, but for a multi-page file and documents with text they come in handy. The table lists the options of GIMP 3 under their names in the English interface. In GIMP 2.10, some of them may be missing.
| Option | What it does |
|---|---|
| Layers as pages | Each layer becomes a separate page, starting from the bottom one. If the image has only one layer, the option is unavailable. |
| Reverse order | Pages are created in reverse order, starting from the top layer. |
| Root layers only | Only top-level items become pages: individual layers and groups. The layers inside a group are merged into one page. |
| Apply layer masks | Applies the layer mask before saving. This does not change how the PDF looks; only the internal structure of the file changes. |
| Convert bitmaps to vector graphics where possible | Where possible, vector graphics are written to the PDF instead of raster images. |
| Omit hidden layers and layers with zero opacity | Hidden layers and layers with zero opacity are left out of the PDF. |
| Fill transparent areas with background color | Transparent areas are filled with the background color. |
| Convert text layers to image | Text layers are turned into a picture. If the option is off, the text of such layers goes into the PDF as text. |
How to make one PDF from several images
Open the first picture, then add the rest as layers with File → Open as Layers. Arrange them in the Layers panel in the order you need. When exporting the PDF, turn on the Layers as pages option: GIMP will create a separate page for each layer, starting from the bottom one.
In the Open as Layers dialog you can select several files at once: hold down Ctrl or Shift while selecting them. All pages will get the size of the image canvas, so it is best to fit pictures of different sizes beforehand: Layer → Scale Layer changes the size of a picture, and the Move tool helps you align it on the canvas.
How to make an A4 PDF
GIMP calculates the PDF page size from the image size in pixels and its resolution. A picture 1920 pixels wide at 72 ppi gives a page about 68 cm wide, and at 300 ppi, about 16 cm. So set the print size before exporting.
- Go to Image → Print Size.
- Choose millimeters and set the width to 210 mm. If the picture’s proportions match the sheet, the height will become 297 mm.
- If the proportions are different, first add margins with Image → Canvas Size, and then set the print size.
- Export the PDF as usual and check the page size in your PDF viewer.
| Resolution | A4 sheet in pixels | Good for |
|---|---|---|
| 300 ppi | 2480 × 3508 | Printing |
| 150 ppi | 1240 × 1754 | Viewing on screen and sending by email |
| 72 ppi | 595 × 842 | Small file size; small text will be hard to read |
Why the PDF turns out too large or blurry
| Problem | What to check |
|---|---|
| The file is too large | Scale down very large photos before exporting. A PDF made from a high-resolution shot keeps a large amount of the original data. |
| Text in a screenshot is blurry | Do not enlarge a small image. It is better to take the screenshot again at a larger size or use an uncompressed original. |
| The pages are out of order | Change the order of the layers and export again. In a multi-page file, layers become pages. |
| The page came out huge or tiny | Check Image → Print Size: the page size depends on the image resolution. |
| You need editable text | Do not turn a text document into a picture: create the PDF in a document editor, where the text stays selectable and searchable. |
FAQ
Can I save a JPG as a PDF without losing the original file?
Yes. Exporting creates a separate PDF, while the original JPG, PNG and GIMP working file stay in place.
Can I add several pages to one PDF?
Yes. Open the images as layers and turn on Layers as pages when exporting. Then check the page order in the finished file.
Why is there no “Save as PDF” command in GIMP?
The XCF format is saved with the regular Save command, while other formats, including PDF, are created with Export As.
How do I make an A4 PDF in GIMP?
Set the print size: Image → Print Size, width 210 mm. If the picture’s proportions differ from the sheet, first add margins with Canvas Size. GIMP calculates the PDF page size from the image’s pixels and resolution.
Will the text in such a PDF be selectable?
Text in a photo or screenshot remains part of the picture: you cannot select it or find it with search. GIMP text layers go into the PDF as text if the Convert text layers to image option is turned off.
Is GIMP suitable for an interactive PDF?
No. GIMP works well for PDFs made from images and layers, but not for forms, clickable links or complex text layout.



Leave a Reply